CNN Sentence Classification (with Theano code)

1. Intro

1
本篇博客来细说CNN在NLP中的一大应用————句子分类。通过Yoon Kim的论文介绍一个应用,分析代码,并重构代码。

传统的句子分类器一般使用SVM和Naive Bayes。传统方法使用的文本表示方法大多是“词袋模型”。即只考虑文本中词的出现的频率,不考虑词的序列信息。传统方法也可以强行使用N-gram的方法,但是这样会带来稀疏问题,意义不大。

CNN(卷积神经网络),虽然出身于图像处理,但是它的思路,给我们提供了在NLP应用上的参考。“卷积”这个术语本身来自于信号处理,它的物理意义可以参考知乎上关于“复利”的回答,或者参考colah大神的博客。简单地说就是一系列的输入信号进来之后,系统也会有一系列的输出。但是并不是某一时刻的输出只对应该时刻的输入,而是根据系统自身的特征,每一个时刻的输出,都和之前的输入相关。那么如果文本是一些列输入,我们当然希望考虑词和词的序列特征,比如“Tom的 手机 ”,使用卷积,系统就会知道“手机是tom”的,而不是仅仅是一个“手机”。

或者更直观地理解,在CNN模型中,卷积就是拿kernel在图像上到处移动,每移动一次提取一次特征,组成feature map,
这个提取特征的过程,就是卷积。

接下来,我们看看Yoon Kim的paper:Convolutional Neural Networks for Sentence Classification (EMNLP 2014)

2. 论文框架介绍

Yoon Kim 自己画的结构图:

具体结构介绍:

1.输入层

可以把输入层理解成把一句话转化成了一个二维的图像:每一排是一个词的word2vec向量,纵向是这句话的每个词按序排列。输入数据的size,也就是图像的size,n×k,n代表训练数据中最长的句子的词个数,这里是64(不够64个词的句子采用zero padding),k是embbeding的维度,这里是300。所谓的static和non-static的chanel解释如下:

  • CNN-rand: 所有的word vector都是随机初始化的,同时当做训练过程中优化的参数;
  • CNN-static: 所有的word vector直接使用无监督学习即Google的Word2Vector工具(COW模型)得到的结果,并且是固定不变的;
  • CNN-non-static: 所有的word vector直接使用无监督学习即Google的Word2Vector工具(COW模型)得到的结果,但是会在训练过程中被Fine tuned;
  • CNN-multichannel: CNN-static和CNN-non-static的混合版本,即两种类型的输入; 从输入层还可以看出kernel的size。很明显kernel的高(h)会有不同的值,图上有的是2,有的是3。这很容易理解,不同的kernel想获取不同范围内词的关系;和图像不同的是,nlp中的cnn的kernel的宽(w)一般都是图像的宽,也就是word2vec的维度,这也可以理解,因为我们需要获得的是纵向的差异信息,也就是不同范围的词出现会带来什么信息。

2.卷积层

由于kernel的特殊形状,因此卷积后的feature map是一个宽度是1的长条。

3.池化层

这里使用是MaxPooling,并且一个feature map只选一个最大值留下。这被认为是按照这个kernel卷积后的最重要的特征。

4.全连接层

这里的全连接层是带dropout的全连接层和softmax。

3. 论文实验介绍

数据

1.word2vec使用谷歌预训练的GoogleNews-vectors-negative300.bin
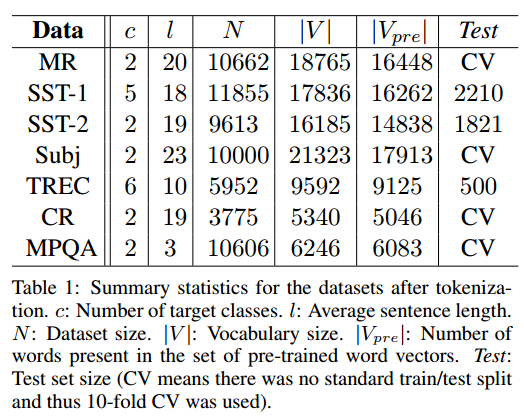
2.数据集

训练和调参

  • filter window(kernel)的高度(h):3,4,5;每个高度的Feature Map的数量为100,一共300个Feature Map;
  • Dropout rate 0.5;
  • L2 constraint (正则化限制权值大小)不超过3;
  • mini-batch size 50;
  • 通过网格搜索方法(Grid Search)得到的最优参数;
  • 优化器使用Adadelta。

结果

4.试着跑跑

Yoon Kim在GitHub上分享了自己的代码和数据集MR(Movie Review, 只有两个类,neg和pos)。
让我们动手跑跑这个程序!

1.加载数据集

1
python process_data.py /home/cer/Data/GoogleNews-vectors-negative300.bin
1
2
3
4
5
6
7
8
loading data... data loaded!
number of sentences: 10662
vocab size: 18765
max sentence length: 56
loading word2vec vectors...
word2vec loaded!
num words already in word2vec: 16448
dataset created!

2.跑模型

使用预先加载的word2vec,并且不改变。

注:为了便于显示cv个数从10减到2。

1
THEANO_FLAGS=mode=FAST_RUN,device=gpu,floatX=float32 python conv_net_sentence.py -nonstatic -word2vec
1
2
3
4
5
6
7
8
9
10
11
12
13
14
15
16
17
18
19
20
21
22
23
24
25
26
27
28
29
30
31
32
33
34
35
36
37
38
39
40
41
42
43
44
45
46
47
48
49
50
51
52
53
54
55
56
57
58
59
60
61
Using gpu device 0: GeForce GTX 960M (CNMeM is disabled, cuDNN not available)
loading data... data loaded!
model architecture: CNN-non-static
using: word2vec vectors
[('image shape', 64, 300), ('filter shape', [(100, 1, 3, 300), (100, 1, 4, 300), (100, 1, 5, 300)]), ('hidden_units', [100, 2]), ('dropout', [0.5]), ('batch_size', 50), ('non_static', True), ('learn_decay', 0.95), ('conv_non_linear', 'relu'), ('non_static', True), ('sqr_norm_lim', 9), ('shuffle_batch', True)]
... training
epoch: 1, training time: 10.58 secs, train perf: 79.86 %, val perf: 75.16 %
epoch: 2, training time: 10.48 secs, train perf: 86.93 %, val perf: 77.89 %
epoch: 3, training time: 11.05 secs, train perf: 88.25 %, val perf: 77.68 %
epoch: 4, training time: 10.73 secs, train perf: 95.44 %, val perf: 79.89 %
epoch: 5, training time: 10.69 secs, train perf: 97.91 %, val perf: 79.58 %
epoch: 6, training time: 11.38 secs, train perf: 99.11 %, val perf: 80.74 %
epoch: 7, training time: 10.80 secs, train perf: 99.13 %, val perf: 79.16 %
epoch: 8, training time: 11.11 secs, train perf: 99.84 %, val perf: 80.53 %
epoch: 9, training time: 11.05 secs, train perf: 99.94 %, val perf: 80.95 %
epoch: 10, training time: 11.03 secs, train perf: 99.91 %, val perf: 79.68 %
epoch: 11, training time: 10.85 secs, train perf: 99.97 %, val perf: 80.74 %
epoch: 12, training time: 11.01 secs, train perf: 99.98 %, val perf: 80.42 %
epoch: 13, training time: 10.64 secs, train perf: 99.98 %, val perf: 80.53 %
epoch: 14, training time: 11.32 secs, train perf: 99.99 %, val perf: 80.32 %
epoch: 15, training time: 11.04 secs, train perf: 99.99 %, val perf: 79.68 %
epoch: 16, training time: 10.98 secs, train perf: 99.99 %, val perf: 80.21 %
epoch: 17, training time: 11.14 secs, train perf: 99.99 %, val perf: 80.53 %
epoch: 18, training time: 11.06 secs, train perf: 99.99 %, val perf: 80.53 %
epoch: 19, training time: 12.21 secs, train perf: 99.99 %, val perf: 80.63 %
epoch: 20, training time: 10.68 secs, train perf: 100.00 %, val perf: 80.95 %
epoch: 21, training time: 10.64 secs, train perf: 100.00 %, val perf: 80.42 %
epoch: 22, training time: 11.16 secs, train perf: 100.00 %, val perf: 80.32 %
epoch: 23, training time: 10.88 secs, train perf: 100.00 %, val perf: 80.53 %
epoch: 24, training time: 10.65 secs, train perf: 100.00 %, val perf: 80.32 %
epoch: 25, training time: 10.84 secs, train perf: 100.00 %, val perf: 80.32 %
cv: 0, perf: 0.793002915452
[('image shape', 64, 300), ('filter shape', [(100, 1, 3, 300), (100, 1, 4, 300), (100, 1, 5, 300)]), ('hidden_units', [100, 2]), ('dropout', [0.5]), ('batch_size', 50), ('non_static', True), ('learn_decay', 0.95), ('conv_non_linear', 'relu'), ('non_static', True), ('sqr_norm_lim', 9), ('shuffle_batch', True)]
... training
epoch: 1, training time: 10.92 secs, train perf: 80.01 %, val perf: 77.16 %
epoch: 2, training time: 10.68 secs, train perf: 87.68 %, val perf: 79.89 %
epoch: 3, training time: 10.78 secs, train perf: 91.45 %, val perf: 80.53 %
epoch: 4, training time: 10.76 secs, train perf: 95.78 %, val perf: 80.63 %
epoch: 5, training time: 10.62 secs, train perf: 97.99 %, val perf: 80.42 %
epoch: 6, training time: 10.69 secs, train perf: 99.10 %, val perf: 79.89 %
epoch: 7, training time: 10.95 secs, train perf: 99.31 %, val perf: 79.68 %
epoch: 8, training time: 10.86 secs, train perf: 99.68 %, val perf: 79.68 %
epoch: 9, training time: 10.64 secs, train perf: 99.82 %, val perf: 79.89 %
epoch: 10, training time: 10.75 secs, train perf: 99.93 %, val perf: 80.32 %
epoch: 11, training time: 10.94 secs, train perf: 99.97 %, val perf: 80.21 %
epoch: 12, training time: 10.71 secs, train perf: 99.99 %, val perf: 80.53 %
epoch: 13, training time: 10.74 secs, train perf: 99.97 %, val perf: 80.00 %
epoch: 14, training time: 10.86 secs, train perf: 99.99 %, val perf: 80.00 %
epoch: 15, training time: 11.00 secs, train perf: 99.99 %, val perf: 79.37 %
epoch: 16, training time: 10.87 secs, train perf: 99.99 %, val perf: 80.11 %
epoch: 17, training time: 10.94 secs, train perf: 99.99 %, val perf: 79.79 %
epoch: 18, training time: 10.73 secs, train perf: 99.99 %, val perf: 79.79 %
epoch: 19, training time: 11.05 secs, train perf: 100.00 %, val perf: 79.89 %
epoch: 20, training time: 11.83 secs, train perf: 100.00 %, val perf: 79.79 %
epoch: 21, training time: 10.85 secs, train perf: 100.00 %, val perf: 80.42 %
epoch: 22, training time: 10.70 secs, train perf: 100.00 %, val perf: 79.79 %
epoch: 23, training time: 10.89 secs, train perf: 100.00 %, val perf: 80.32 %
epoch: 24, training time: 10.78 secs, train perf: 100.00 %, val perf: 80.00 %
epoch: 25, training time: 11.19 secs, train perf: 100.00 %, val perf: 80.32 %
cv: 1, perf: 0.814338235294
0.803670575373

5. 代码梳理

接下来研究研究Yoon Kim的代码,看看像这样的一个Deep NLP的应用,是怎么实现的。

5.1 大体结构:

process_data.py:

数据预处理,数据以[revs, W, W2, word_idx_map, vocab]保存在pkl文件“mr.p”中。

revs的单条数据格式如下:

1
2
3
4
5
 datum = {"y": 1,
"text": orig_rev,
"num_words": len(orig_rev.split()),
"split":
np.random.randint(0, cv)}

其中y是类标;text是句子原文(经过清洗);num_words是句子长度(词数);split是分配的cv索引。

  • W即word matrix,W[i]是索引为i的词对应的词向量。
  • W2类似于W,但是是随机初始化的。
  • word_idx_map是一个dict,key是数据集中出现的word,value是该word的索引。
  • vocab是一个dict,key是数据集中出现的word,value是该word出现的次数。

conv_net_classes.py:

定义具体的模型结构,不同的结构的层用不同的类定义。

如:

1
2
3
4
class
HiddenLayer(object)
class MLPDropout(object)
class LogisticRegression(object)

conv_net_sentences.py

完成数据的加载,模型的构建和连接,再训练模型。

5.2 数据流:

输入的数据来自rt-polarity.neg和rt-polarity.pos,原始数据是很多英文句子,类标从文件名获取。以及google的word2vec。

process_data.py中:

  • 1.build_data_cv():接收数据集文件,读取两个文件,生成基本数据revs(rev的内容上面已经分析)。

  • 2.load_bin_vec():从GoogleNews-vectors-negative300.bin中加载w2v矩阵。生成w2v。w2v是一个dict,key是word,value是vector。

  • 3.get_W():接收w2v,相当于把w2v从字典转换成矩阵W,并且生成word_idx_map。相当于原来从word到vector只用查阅w2v字典;现在需要先从word_idx_map查阅word的索引,再2用word的索引到W矩阵获取vector。

conv_net_sentences.py中:

  • 4.make_idx_data_cv():读取rev中的text字段,传入get_idx_from_sent()方法,将句子转换成一个list,list里面的元素是这句话每个词的索引。这个list形如(filter padding) - (word indices) - (Max padding) - (filter padding),长度为max_l+2×(filter_h-1),每句句子虽然本身长度不同,经过这步都转换成相同长度的list。然后,按照cv索引,分割训练集和测试集。

5.3 模型架构:

conv_net_classes.py中:

定义了所有网络层次和具体实现:

  • HiddenLayer
  • DropoutHiddenLayer
  • MLPDropout
  • MLP
  • LogisticRegression
  • LeNetConvPoolLayer

这些类大多数的实现都在init方法中:

  1. 首先接收这一层的输入输出的尺寸和这一层的输入数据。
  2. 然后初始化这层的参数,参数都是theano.shared。
  3. 对于给定的输入和参数,构建这层的输出。

conv_net_sentences.py

获取训练数据和测试数据以后,绝大部分的工作由train_conv_net()完成:

  1. 传入参数分为两部分:(1)训练数据+W矩阵(2)模型结构参数
  2. 组建模型网络:每层的定义都在conv_net_classes.py中实现了,因此这里组建网络首先要初始化一个参数list:parameters,将每层的参数加入这个list统一管理;然后对于每一层,初始化该层的类,给该层喂入数据,获取输出;再将输出喂给下一层,依照输入输出将每一层连接起来。
  3. 将训练数据抽取0.1作为val数据。
  4. 构建function(theano.function):(1)根据cost function构建train_model;(2)构建val集的测试函数:val_model(3)构建测试集的测试函数:test_model。
  5. 开始训练。

6 代码重构

6.1 为什么重构

首先要明确重构代码的目的:我不是真的认为Yoon Kim的代码写的不好,我也不认为我重构完以后架构有多好;我的目的是learn by doing,通过重构代码加深对代码的理解,这是学习代码最好的方式之一。

6.2 哪里可以重构

这份代码本来就是一分学术论文的实验代码,可扩展性不高,我想用工业界的玩法去改这份代码,下面列出可以重构的地方:

  1. 如何定义神经网络某一层。原来的代码用一个类定义一层,这本身没有问题,但所有的细节都在init方法中实现,让该方法显得很臃肿,我们可以根据职责的不同,分开两个方法:init_param()和build()。也就是构建某一层神经网络最重要的两部:初始化参数和根据输入获取输出。
  2. train_conv_net()方法太臃肿,这一步包括了构建网络,拆分train/val,构建function,训练。一共四大步,我们应该把每步拆分开。
  3. 为什么没有模型的类?模型的行为类似于具体某层的行为,一层可以是类,为什么很多层组装以后反而装在一个方法里?我们也可以写一个模型类。
  4. 模型的结构参数为什么由方法参数传入?我们可以写一个config文件,把模型的结构参数写在这个config文件里。这样再做实验时,调模型的参数只需修改config文件。

6.3 重构细节

接下来按照上面的几点,演示下重构的细节:

  • cer_main.py:加载数据,开始训练。
  • cer_module.py:每层模型的实现细节。
  • cer_model.py:整体模型的实现。

1.重构单层类:

重构前:

1
2
3
4
5
6
7
8
9
10
11
12
13
14
15
16
17
18
19
20
21
22
23
24
25
26
27
28
29
30
31
32
33
34
35
36
37
38
39
40
41
42
43
44
45
class HiddenLayer(object):
"""
Class for HiddenLayer
"""
def __init__(self, rng, input, n_in, n_out, activation, W=None, b=None,
use_bias=False):

self.input = input
self.activation =
activation

if W is None:
if
activation.func_name == "ReLU":
W_values = numpy.asarray(0.01 *
rng.standard_normal(size=(n_in, n_out)), dtype=theano.config.floatX)
else:
W_values =
numpy.asarray(rng.uniform(low=-numpy.sqrt(6. / (n_in + n_out)),
high=numpy.sqrt(6. / (n_in + n_out)),
size=(n_in, n_out)), dtype=theano.config.floatX)
W =
theano.shared(value=W_values, name='W')
if b is None:
b_values = numpy.zeros((n_out,), dtype=theano.config.floatX)
b =
theano.shared(value=b_values, name='b')

self.W = W
self.b = b
if use_bias:
lin_output = T.dot(input, self.W) + self.b
else:
lin_output = T.dot(input, self.W)

self.output =
(lin_output if activation is None else activation(lin_output))

#
parameters of the model
if use_bias:
self.params = [self.W,
self.b]
else:
self.params = [self.W]

重构后:

1
2
3
4
5
6
7
8
9
10
11
12
13
14
15
16
17
18
19
20
21
22
23
24
25
26
27
28
29
30
31
32
33
34
35
36
37
38
39
40
41
42
43
44
45
46
47
48
49
50
51
52
class HiddenLayer(object):
"""
Class for HiddenLayer
"""

def
__init__(self, rng, n_in, n_out, activation, W=None, b=None):

self.rng
= rng
self.activation = activation
self.init_param(W, b, n_in,
n_out)

def init_param(self, W, b, n_in, n_out):
if W is None:
if self.activation.func_name == "ReLU":
W_values =
numpy.asarray(0.01 * self.rng.standard_normal(size=(n_in, n_out)),
dtype=theano.config.floatX)
else:
W_values =
numpy.asarray(
self.rng.uniform(low=-numpy.sqrt(6. / (n_in +
n_out)), high=numpy.sqrt(6. / (n_in + n_out)),
size=(n_in, n_out)), dtype=theano.config.floatX)
W =
theano.shared(value=W_values, name='W')
if b is None:
b_values = numpy.zeros((n_out,), dtype=theano.config.floatX)
b =
theano.shared(value=b_values, name='b')

self.W = W
self.b = b
def build(self, input, use_bias=False):
if use_bias:
lin_output = T.dot(input, self.W) + self.b
else:
lin_output
= T.dot(input, self.W)

self.output = (lin_output if self.activation is
None else self.activation(lin_output))

# parameters of the model
if use_bias:
self.params = [self.W, self.b]
else:
self.params = [self.W]

return self.output

2.重构整体模型的构建:

1
2
3
4
5
6
7
8
9
10
11
12
13
14
15
16
17
18
19
20
21
22
23
24
25
26
27
28
29
30
31
32
33
34
35
36
37
38
39
40
41
42
43
44
45
46
47
48
49
50
51
52
53
54
55
56
57
58
################################网络架构:1.初始化###########################
#
1.embedding层
self.emb_layer = EmbeddingLayer(U)
# 2.卷积层
self.conv_layers = []
for i in xrange(len(self.conf['filter_hs'])):
filter_shape = filter_shapes[i]
# print "filter_shape:",
filter_shape
pool_size = pool_sizes[i]
conv_layer =
LeNetConvPoolLayer(rng, image_shape=(self.conf['batch_size'], 1, self.img_h,
self.conf['img_w']),
filter_shape=filter_shape, poolsize=pool_size,
non_linear=self.conf['conv_non_linear'])
self.conv_layers.append(conv_layer)
# 3.MLP(多层神经感知机,带dropout)
self.conf['hidden_units'][0] = feature_maps * len(self.conf['filter_hs'])
self.classifier = MLPDropout(rng, layer_sizes=self.conf['hidden_units'],
activations=[eval(f_s) for f_s in self.conf['activations']],
dropout_rates=self.conf['dropout_rate'])
#################################网络架构:2.连接网络#########################
#
1.embbeding层
emb_output = self.emb_layer.build(self.x)
# 2.卷积层
layer0_input = emb_output
layer1_inputs = []
for i in
xrange(len(self.conf['filter_hs'])):
conv_layer =
self.conv_layers[i]
layer1_input =
conv_layer.build(layer0_input).flatten(2)
layer1_inputs.append(layer1_input)
layer1_input =
T.concatenate(layer1_inputs, 1)
self.classifier.build(layer1_input)
###################提取模型参数########################################
#
define parameters of the model and update functions using adadelta
params = self.classifier.params
for conv_layer in self.conv_layers:
params += conv_layer.params
if self.conf["non_static"]:
# if
word vectors are allowed to change, add them as model parameters
params += [emb_output.Words]

self.cost =
self.classifier.negative_log_likelihood(self.y)
self.dropout_cost =
self.classifier.dropout_negative_log_likelihood(self.y)
self.grad_updates = sgd_updates_adadelta(params, self.dropout_cost,
self.conf['lr_decay'],
1e-6,
self.conf['sqr_norm_lim'])

3. 增加整体模型的类:CNN_Sen_Model()

类方法:

  • build_model()
  • train()
  • build_function()

整体模型的类和具体某层的类共同点在于build,也就是给定输入获取输出的过程。不同点在于要少一个init_param()方法,因为整体模型不需要去初始化模型训练的参数,直接从细节类获取即可。另外还多一个train的方法用于模型的训练。

具体可以看我的代码

4.将模型参数保存在model.json中:

1
2
3
4
5
6
7
8
9
10
11
12
13
14
15
16
{
"img_w":300,
"max_l":56,
"filter_hs":[3, 4, 5],
"hidden_units":[100, 2],
"dropout_rate":[0.5],
"shuffle_batch":true,
"n_epochs":25,
"batch_size":50,
"lr_decay":0.95,
"conv_non_linear":"relu",
"activations":["Iden"],
"sqr_norm_lim":9,
"non_static":false,
"word_vectors":"word2vec"
}

来跑跑看:

1
THEANO_FLAGS=mode=FAST_RUN,device=gpu,floatX=float32 python cer_main.py
1
2
3
4
5
6
7
8
9
10
11
12
13
14
15
16
17
18
19
20
21
22
23
24
25
26
27
28
29
30
31
32
33
34
35
36
37
Using gpu device 0: GeForce GTX 960M (CNMeM is disabled, cuDNN not available)
/home/cer/anaconda2/lib/python2.7/site-packages/theano/tensor/signal/downsample.py:6: UserWarning: downsample module has been moved to the theano.tensor.signal.pool module.
"downsample module has been moved to the theano.tensor.signal.pool module.")
loading data... model architecture: CNN-static
using: word2vec vectors
model configs: {u'dropout_rate': [0.5], u'hidden_units': [100, 2], u'word_vectors': u'word2vec', u'filter_hs': [3, 4, 5], u'conv_non_linear': u'relu', u'max_l': 56, u'img_w': 300, u'batch_size': 50, u'n_epochs': 25, u'sqr_norm_lim': 9, u'non_static': False, u'shuffle_batch': True, u'activations': [u'Iden'], u'lr_decay': 0.95}
emb_output shape : [1029 1 64 300]
conv_layer shape : [1029 100 1 1]
... training
epoch: 1, training time: 6.09 secs, train perf: 77.54 %, val perf: 73.79 %
epoch: 2, training time: 6.05 secs, train perf: 84.10 %, val perf: 76.53 %
epoch: 3, training time: 5.84 secs, train perf: 83.85 %, val perf: 76.32 %
epoch: 4, training time: 6.36 secs, train perf: 89.45 %, val perf: 78.32 %
epoch: 5, training time: 6.01 secs, train perf: 94.51 %, val perf: 79.26 %
epoch: 6, training time: 6.72 secs, train perf: 95.07 %, val perf: 78.63 %
epoch: 7, training time: 6.96 secs, train perf: 98.09 %, val perf: 79.89 %
epoch: 8, training time: 6.41 secs, train perf: 98.91 %, val perf: 80.00 %
epoch: 9, training time: 6.19 secs, train perf: 99.39 %, val perf: 78.63 %
epoch: 10, training time: 6.57 secs, train perf: 98.83 %, val perf: 78.84 %
epoch: 11, training time: 6.84 secs, train perf: 99.68 %, val perf: 80.00 %
epoch: 12, training time: 5.84 secs, train perf: 99.84 %, val perf: 78.74 %
epoch: 13, training time: 5.93 secs, train perf: 99.82 %, val perf: 79.16 %
epoch: 14, training time: 5.94 secs, train perf: 99.95 %, val perf: 78.63 %
epoch: 15, training time: 6.39 secs, train perf: 99.94 %, val perf: 78.42 %
epoch: 16, training time: 6.92 secs, train perf: 99.95 %, val perf: 79.16 %
epoch: 17, training time: 6.83 secs, train perf: 99.98 %, val perf: 78.53 %
epoch: 18, training time: 6.72 secs, train perf: 99.98 %, val perf: 79.26 %
epoch: 19, training time: 5.97 secs, train perf: 99.98 %, val perf: 78.63 %
epoch: 20, training time: 5.92 secs, train perf: 99.98 %, val perf: 78.63 %
epoch: 21, training time: 6.56 secs, train perf: 99.98 %, val perf: 79.37 %
epoch: 22, training time: 6.05 secs, train perf: 99.98 %, val perf: 78.95 %
epoch: 23, training time: 6.69 secs, train perf: 99.98 %, val perf: 78.63 %
epoch: 24, training time: 7.03 secs, train perf: 99.98 %, val perf: 78.84 %
epoch: 25, training time: 6.06 secs, train perf: 99.98 %, val perf: 79.16 %
cv: 0, perf: 0.781341107872

7. 结语

这篇博客记录了这个CNN Sentence Classification的基础论文和代码实现,并没有关注调参,Yoon Kim的github提到了一篇关于这种模型调参的paper,有兴趣可以去看看。

这个模型还有Tensorflow的实现,同样可以看看。